Step by step instructions to do house wiring
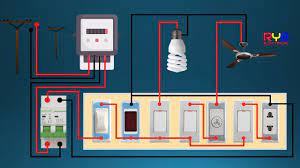
A house for the most part has five focuses. Nonetheless, focuses might be pretty much as required. The proprietor of the house concludes where the lights, fans and attachments for the TV will be. Furthermore as per this point the technician ascertains the merchandise. For instance the number of wires of any size will be required, the number of channels will be required, the number of switch birds and switches will be required and so forth
It is worth focusing on here that it takes around 40 yards to wiring a house estimating 12 feet by 15 feet. It takes 6 channels. It takes 3/4 of the switch. It takes 2 attachments, 2 holders and 2 roof ranges.
The most effective method to make point and joint box space
First conclude the number of focuses and joint boxes there will be in a room. Assume a room has five focuses and a joint box. The method for doing the wiring for this situation is referenced underneath:
The space on the divider through which the channel will go to its different places, first imprint the space with the assistance of shaded chalk or pencil. Then, at that point, mark with a screw guide pencil toward join the channel to that spot.
Screws are generally embedded one foot separated to join the channel to the divider. Then, at that point, measure the spot with estimating tape or dressing tape. Work out the number of inches or the number of feet the channel will take starting with one point then onto the next. Cut the lower part of the channel to estimate with a hack-cutting edge.
Have a drill machine, channel Racal fitting, screw and driver and a current instrument. Since this large number of things will be required while doing house wiring. Channels and joint boxes are typically positioned eight feet over the dividers from the floor of the house. Furthermore the switch bearing is introduced four and a half feet over the divider from the floor of the house.
Step by step instructions to put the channel on the divider
To wiring the house, you need to place the channel on the divider first. Then, at that point, you need to interface the electric wire through it. Presently we will know how to place channel on the divider
Take the hand drill machine. Append a divider digit of size 8 mm to the substance of the machine. Then, at that point, place the essence of the boring apparatus on the point set apart with pencil or chalk.
Then, at that point, turn the handle of the machine to one side and make an opening one and a half creeps in the divider. Embed the Racal plug into the opening.
Open the channel cover. Presently hold the lower part of the channel along the lower part of the imprint on the divider. Then, at that point, mark along the screw point on the channel with the top of the pencil or screwdriver.
Presently put the channel on a piece of wood. Then, at that point, drill openings at the checked focuses along the center of the channel. Then, at that point, place the direct along the opening in the divider. Then, at that point, take a one inch screw. Embed the screws through the opening in the divert along the opening in the divider. Then, at that point, affix the screws on the channel with a screwdriver. Place the lower part of the channel as indicated by this standard all around the dividers.
During wiring, here and there 2 wires are gotten through the channel. Assuming two wires are pulled, there will be a fourth of an inch channel. Here and there you need to get 4 to 5 wires through the channel. 4/5 wire pulls will take 1 inch wide channel. Also to pull more than 4/5 of them, it will take one and a half inch channel.
Presently begin introducing channels from the principle switch.
Joint Box:
Interface the channel from the primary change to the joint box and carry it to the lower part of the joint box. Presently take a joint box estimating four crawls by four inches. The joint box has two screw focuses.
Open the top of this crate. Then, at that point, put the lower part of the crate on the divider and imprint the two screw focuses on the divider. Presently eliminate the base piece of the container from the divider. Then, at that point, drill an opening in the divider with a drill machine. Presently embed the Racal plug into the openings and put the joint box on it. Then, at that point, embed 2 screws along the opening in the joint box. Then, at that point, secure the screws with a screwdriver.
Bulb point:
Put one more channel on the opposite side of the joint box and bring it up to the mark of the bulb on the divider. Hold the board holder toward the finish of this channel. The strip holder has two screw focuses. Mark the screw points of the holder on the two dividers. Then, at that point, drill with the drill machine at the checked put on the divider.
Attachment point:
Presently place the necessary channel from the joint box to the attachment point as in the past. Then, at that point, take the lower part of the attachment point switch bar. Presently screw the lower some portion of the change bird to the divider like the lower part of the joint box. From this attachment point all electrical hardware is run.
Tube light focuses
Take a half inch channel. Place the channel from the passed on side of the joint box to the mark of the cylinder light. Take the roof raj banana confine hand. Presently put the roof edge box on the divider just beneath the channel. Then, at that point, mark the screw point of the container on the divider for mounting on the roof edge divider. Presently drill the dividers.
In the wake of penetrating, take the casing of pole light or cylinder light. Place the casing evenly 6 creeps underneath the roof edge. Presently mark the 3 screw points of the casing on the divider with a screwdriver.
Fan focuses:
Take a half inch channel. Place the channel from the highest point of the joint box to the mark of the fan. Presently take a crate of roof rage. Mark the screw point on the divider for introducing the roof edge box according to the past rule. Then, at that point, drill the dividers and introduce the roof edge.
Switch Baird:
Take the channel one and a half inches wide. Place the channel one and a half creeps from the base right of the joint box to the primary switch bar. All in all, place the channel up to the switch baird which will have switches and attachments for fans, lights and so on Then, at that point, append the lower part of the switchbird to the divider according to the past rule.


Comments
Post a Comment